When I first started getting serious about videography, one of the biggest hurdles I faced was not being able to truly see what my camera saw. Relying solely on the small built-in screen meant I was constantly guessing focus, struggling with exposure in bright sunlight, and couldn’t properly frame shots, especially when the camera was in awkward positions. This lack of visual feedback was incredibly frustrating and often led to missed opportunities or flawed footage that I only discovered later in editing. Getting a reliable external display wasn’t just a luxury; it was essential to elevating the quality of my work and saving countless hours of reshoots or fixing things in post.
- 7" IPS screen, Ultra HD1280x800 resolution, Brightness: 400cd/m2, Contrast: 800:1, Aspect Ratio:16:10, Dot Pitch:0.11775(H) × 0.11775(V) mm, Response time: 25ms
- Advanced Features: Peaking Focus Assist, Check Field (Red,Green,Blue,Mono), Camera Mode, Pixel to Pixel * Center Marker, Screen Marker (80%,85%,90%,93%,96%,2.35:1), Image Flip (H, V, H/V), Image...
- Ultra-thin lightweight design,slim design 17mm, portable light compatible for steadycam, DSLR Rig, Camcorder Kit, Handheld Stabilizer, Video Camera Crane
What to Look for in a Field Monitor
Stepping into the world of external camera monitors can be a bit overwhelming. Why would someone need one in the first place? Essentially, they address the limitations of your camera’s small, often hard-to-see, built-in screen. Whether you’re shooting outdoors in bright sun, trying to nail focus on a subject’s eyes, or composing a shot from a low or high angle, a good field monitor provides a larger, clearer, and often more accurate view of your image.
The ideal customer for a monitor like this is anyone shooting video professionally or seriously as a hobbyist – documentary filmmakers, wedding videographers, independent short film creators, or even just YouTubers who need to see themselves clearly. If you’re primarily a photographer who only occasionally shoots video or just captures casual clips, a dedicated field monitor might be overkill; your camera’s screen might suffice, or a simpler, less feature-rich option could be better.
Before buying, there are several key factors to consider. First, screen size and resolution – is it large enough to see detail but not so large it’s cumbersome? Does the resolution provide a sharp enough image? Brightness is crucial, especially for outdoor shooting, to combat glare. Features are also vital: do you need tools like focus peaking, false colour (though this model doesn’t have it, it’s a common feature to look for), zebras, or frame markers? Input/output options (HDMI is standard, but do you need others?) and power options (what batteries does it use, how long do they last?) are practical considerations. Finally, build quality and mounting options matter – will it withstand regular use, and can you easily attach it to your rig?
- 【7 Inch External Field Monitor】 The camera monitor videography equipment features a 7 inch wide view angle IPS panel in an ultra thin 17mm design with LED backlight. With an HD resolution of 1280...

- 💖【HOME HELPER】: VM924 Baby Monitor With a 5-inch LCD display and high-definition camera, equipped with 2.4GHz wireless technology, audio and video monitoring functions, and infrared night...

- 【5" Clear IPS Display】Enjoy a crystal-clear view on the generous 5-inch IPS display of our baby monitors. With its high-resolution display and IPS technology, you can see every detail with...
Meet the FEELWORLD FW759
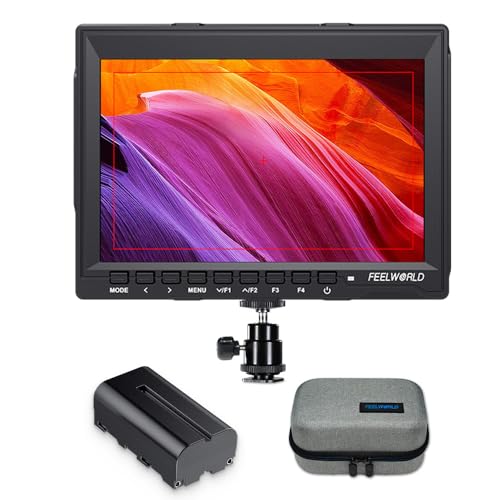
The FEELWORLD FW759 is a 7 inch field monitor designed to give videographers a better view of their footage in real-time. It promises a clearer, larger display than typical camera screens and includes a suite of features to aid in achieving critical focus, proper exposure, and precise framing. When you purchase the FW759, the package is quite comprehensive for its price point. It includes the monitor itself, a mini HDMI cable (though you might need a different adapter depending on your camera), a sunshade, a hot shoe mount for camera attachment, an F970 battery plate (allowing use of larger NP-F batteries, though an F550 plate is also included), a smaller F550 2200mAh battery to get you started, an HDMI plug lock to secure your connection, and an operation manual.
This specific monitor feels like a solid option for serious amateur and burgeoning professional videographers who need essential monitoring tools without breaking the bank. It’s particularly well-suited for run-and-gun setups, DSLR/mirrorless rigs, or smaller gimbal systems where keeping weight down is important but a larger screen is desired. It’s probably not the monitor for high-end cinema camera setups requiring SDI connections, waveform monitors, or extremely high brightness for direct sunlight shooting without a sunshade, but for its target audience, it’s quite capable.
Here’s a quick look at the pros and cons based on my long-term use:
Pros:
* Generous 7-inch screen size for better viewing.
* Includes essential monitoring tools like focus peaking and markers.
* Ultra-thin and lightweight design makes it portable.
* Comes with a useful accessory package including a battery, sunshade, and mount.
* Supports a wide range of input resolutions and frame rates, including 4K input.
Cons:
* Resolution (1280×800) is not Full HD 1080p.
* Brightness (400cd/m²) can be challenging in direct, bright sunlight even with the sunshade.
* The included hot shoe mount can be a bit wobbly or feel less robust over time.
* The menu system can be slightly unintuitive initially.
* Only has HDMI input, no SDI.
Digging Into the FW759‘s Capabilities
Let’s dive deeper into what makes the FEELWORLD FW759 a practical tool for video production, based on my experience using it regularly. The combination of its physical design and built-in software features work together to address the common pain points faced when relying solely on a camera’s native screen.
The 7″ IPS Display: Size and Clarity
The cornerstone of any external monitor is its screen, and the FW759 features a 7 inch IPS panel. For me, moving up to 7 inches from the typically much smaller 3- or 4-inch camera screens was a revelation. It provides a significantly larger window into your scene, making it much easier to judge what’s happening. The IPS technology is important because it offers wide viewing angles. This means that even if you’re not looking at the monitor dead-on – which is often the case when it’s mounted on a camera rig or a crane – the colours and contrast remain consistent. This is a huge benefit when collaborating with others on set or when your shooting position isn’t ideal.
While the resolution is 1280×800, which isn’t Full HD 1080p, it’s still sharp enough at a normal viewing distance for a 7-inch screen to get the job done for framing and checking overall image quality. You might not pixel-peep here as effectively as on a higher-resolution screen, but combined with the peaking feature (which I’ll get to), it’s sufficient for ensuring your subject is in focus. The 16:10 aspect ratio is also a standard monitor ratio, providing a slightly taller display than the typical 16:9 video format, which some users prefer as it leaves a bit of space for overlays.
Essential Monitoring Tools: Boosting Confidence on Set
Where the FEELWORLD FW759 really proves its worth is in the suite of advanced features it includes. These aren’t just bells and whistles; they are genuinely useful tools that directly impact your ability to capture good footage.
Peaking Focus Assist: This is arguably the most critical feature for any external monitor, especially when shooting with shallow depth of field. The peaking feature highlights the sharpest edges in your image with a selectable colour (like red, green, or blue). This visual overlay makes it incredibly easy to see exactly what is in focus, much more so than zooming in on a camera’s small screen. After using the FW759 for a while, I’ve found I can trust the peaking assist to confirm critical focus even when my subject is moving slightly. It’s a massive time saver and confidence booster compared to squinting at a tiny display.
Check Field (Red, Green, Blue, Mono): This function allows you to view the image in a single colour channel or in monochrome. Why is this useful? Checking individual colour channels can help you assess noise levels in each channel, or identify potential colour casting issues. The monochrome view is excellent for judging exposure and contrast without being distracted by colour information, helping you focus solely on the luminance values in your scene.
Camera Mode: While the manual isn’t always perfectly clear on every single function’s name, ‘Camera Mode’ typically refers to a display setting that shows the pure video feed from your camera, potentially hiding some of the monitor’s own overlays or simplifying the interface. This gives you a clean view, which can be useful for final composition checks.
Pixel to Pixel: This feature displays a section of the input signal at its native resolution, effectively giving you a 1:1 zoom. While the screen itself is 1280×800, if you’re sending a 1080p signal, using pixel-to-pixel lets you see the true detail of a specific area without interpolation. This is invaluable for checking fine details and ensuring absolute critical focus, especially on eyes or textures.
Center Marker and Screen Markers: Framing your shot precisely is key, and these markers help tremendously. The center marker is simple but ensures you know the exact middle of your frame. Screen markers provide overlays indicating specific safe areas (like 80%, 85%, 90%, etc.) or common aspect ratios like 2.35:1 (cinemascope). I rely heavily on the safe area markers to ensure important elements of my composition won’t be cut off by different display aspect ratios or overscan on various playback devices.
Image Flip (H, V, H/V): This might seem minor, but it’s incredibly useful when mounting the monitor in unconventional ways, such as on a gimbal where the monitor might be inverted or reversed. The ability to flip the image horizontally, vertically, or both ensures you always see the picture oriented correctly, making operation much more intuitive regardless of your rig setup.
Image Freeze: The freeze frame function lets you capture a static image of the current frame. This can be helpful for comparing successive takes, checking subtle changes in a scene, or simply getting a closer look at a particular moment in time before continuing to record.
Custom Color Temperature: While not a full calibration suite, the ability to adjust the colour temperature allows you to fine-tune the monitor’s colour rendition to better match your camera’s output or your desired look. Getting the colours on the monitor as close as possible to the final output helps immensely with judging white balance and colour palettes on set.
Design and Compatibility: Light and Adaptable
One of the standout physical characteristics of the FW759 is its ultra-thin and lightweight design, measuring only 17mm thin. When you’re adding gear to a camera rig, weight is always a concern, especially on smaller mirrorless cameras or gimbals. This slim profile makes the monitor very manageable and less likely to unbalance your setup. Its light weight means you can comfortably mount it on a variety of equipment, from a steadycam and DSLR rig to camcorder kits, handheld stabilizers, and even video camera cranes. The included hot shoe mount works for basic on-camera attachment, though as noted in the cons, it can feel a bit less stable than dedicated, heavier-duty mounts.
Connectivity and Format Support: Keeping You Hooked Up
The primary input on the FW759 is HDMI, which is the standard for most DSLRs, mirrorless cameras, and many camcorders. What’s impressive for a monitor in this category is its extensive support for various HDMI input formats. This monitor can accept signals ranging from older 480i/p and 576i/p, through various 720p and 1080i/p frame rates (up to 60fps), all the way up to 4K UHD (3840×2160p) at 30Hz and even DCI 4K (4096×2160p) at 24Hz. While the monitor itself doesn’t display at 4K resolution, its ability to *receive* these signals is crucial because many modern cameras output 4K via HDMI even when recording internally at a lower resolution, or when outputting for external recording. The monitor downscales this signal to its native resolution while still giving you a live view, ensuring compatibility with a wide range of cameras.
Powering Your Shoots: Battery Life and Convenience
Powering external gear on location is always a consideration. The FW759 uses standard Sony NP-F type batteries, which are widely available and relatively affordable. The package includes an F970 plate, which accepts larger batteries (like the NP-F970, NP-F770), and it conveniently comes with an F550 2200mAh battery and adapter plate to get you started. One of the user reviews I’ve seen highlighted the battery’s LED indicator and USB-C recharging capability, which is a fantastic modern touch, meaning you might not need a dedicated charger just for the battery. The monitor itself has very low power consumption (around 5W), which is great for making the included F550 battery last a reasonable amount of time, or making larger batteries last for extended shoots. This low power draw is a significant advantage when you’re on location and power sources are limited.
Included Accessories: Ready to Go
The inclusion of several key accessories right in the box adds significant value. The sunshade is essential for making the 400cd/m² brightness usable outdoors. The hot shoe mount allows you to immediately attach it to your camera. The differing battery plates are thoughtful, offering flexibility. The mini HDMI cable gets you connected (though again, check your camera’s port type). Even the HDMI plug lock is a small but crucial item that prevents accidental cable disconnects, which can ruin a shot. Getting these necessary bits and pieces included means you don’t have to immediately go out and buy extras just to get the monitor working with your setup.
Overall, the FEELWORLD FW759 7 Inch DSLR Camera Field Monitor packs a considerable punch for its price point. While it has some limitations like the resolution not being Full HD and the brightness being average, the combination of a larger screen, essential professional monitoring tools, lightweight design, broad compatibility, and a useful accessory package makes it a highly practical tool for improving your video production workflow. Having used it for a while now, it has become an indispensable part of my kit, making it much easier to achieve the results I want directly in-camera.
What Others Are Saying About the FW759
I’ve poked around online to see what other users think about the FW759, and the feedback generally aligns with my own experience, particularly concerning its value. Many users praise it as being one of the best 7-inch monitors available at its price point, highlighting that it includes all the necessary tools for both amateur and professional videographers, like focus assist and framing grids. People appreciate the monitor’s very low power consumption, noting that it helps batteries last well during filming. The included battery, often mentioned as an NP-F550 type with handy features like LED battery indicators and USB-C charging, is seen as a very convenient addition, avoiding the need for large chargers. The practicality of the included sunshade for daytime shoots and the carrying case are also frequently mentioned positive points. While overall sentiment is positive, some users have pointed out that the included mount feels a bit flimsy and can wobble, which is a minor drawback for an otherwise solid package.
Final Thoughts on the FEELWORLD FW759
The fundamental problem this field monitor solves is the inability to accurately see and judge your footage while you’re shooting, a limitation of most built-in camera screens. Ignoring this can lead to missed focus, incorrect exposure, or poor framing, forcing costly reshoots or compromises in editing. The FEELWORLD FW759 is a great fit for solving this because, first, its 7-inch screen provides a much larger, clearer view; second, it includes critical tools like focus peaking to ensure sharpness; and third, it does all this within a lightweight package at an accessible price point, making it easy to integrate into most video setups. To see the full details and check it out for yourself, Click here.
Last update on 2025-09-20 / Affiliate links / Images from Amazon Product Advertising API