There was a time when achieving perfect long exposures or smooth time-lapses felt like a constant battle against camera shake and manual timing. If you’re a photographer who’s ever tried capturing star trails, silky smooth waterfalls, or those captivating sunrises and sunsets that unfold over time, you know the frustration. Relying solely on your camera’s built-in timer or manually pressing the shutter for extended periods introduces unwanted vibration and makes precise, repeatable sequences nearly impossible. Not addressing this means blurry shots, inconsistent time-lapses, and ultimately, missed opportunities for stunning images.
- Compact Size:12.1*4.0*2.1cm, 90cm long wired remote controller, powered by 2 AAA Alkaline batteries
- Self-timer, interval timer, long-exposure timer and exposure-count setting features
- Take Photos without Camera Shake and great for Time-Lapse Photography
Key Considerations for Choosing an Intervalometer
Before diving into specifics, let’s touch upon why photographers seek out tools like intervalometers or timer remotes in the first place. They fundamentally solve the problem of interacting with your camera during critical moments, whether that’s eliminating vibration during a long exposure or automating a series of shots for a time-lapse. An ideal customer for a camera remote timer is someone interested in landscape photography, astrophotography, architectural photography, or any scenario requiring exposures longer than the typical 30 seconds available on camera or precise, timed shot sequences. If you only ever shoot handheld in good light, you likely don’t need one. For others, understanding key features is crucial. You’ll want to think about compatibility with your specific camera model, whether you need wired or wireless connectivity, the range of timer settings (self-timer, interval, long exposure), the maximum number of exposures it can handle, and the overall build quality and ease of use. Battery type and longevity are also practical points to consider, especially for extended shooting sessions.

- Zoom Control and Record: Use 2.5mm/0.1in interface for zoom control and recording the start or stop function.

- Function:Zoom control remote controller support Record Start/Stop, Two-Step Zoom, Take Photos, Power Camcorder On/Off .

- Ergonomic Page Turner Ring: New exterior design, freeing your hands. Page turners for a wide range of capacitive screen devices. With the page turning remote control, no need to continuously touch the...
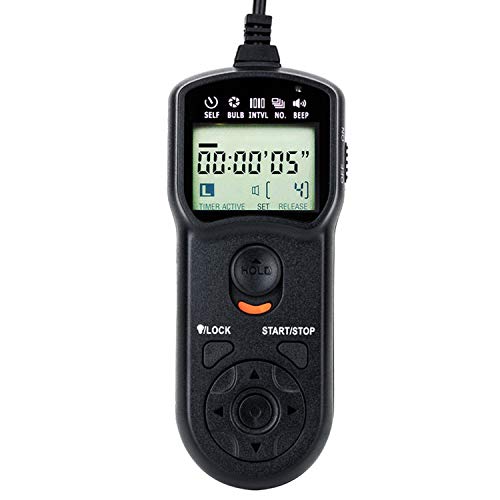
Introducing the JJC TM-F2 Wired Remote
This is where the JJC Intervalometer Timer Remote Shutter Release Time Laspe for Nikon cameras comes into play. It’s a dedicated wired timer remote designed to give you granular control over your camera’s shutter, particularly for complex shooting scenarios. It promises precise timing for long exposures, interval shooting for time-lapses, and even self-timer functions, all while keeping your hands off the camera itself. When you purchase it, you get the main unit and the connecting cable, powered by two AAA batteries. Compared to expensive first-party remotes, the JJC wired remote aims to provide similar functionality at a more accessible price point. It’s specifically geared towards users of compatible Nikon DSLRs and mirrorless cameras who need advanced timing capabilities beyond a basic shutter release. It’s not for someone looking for a simple point-and-shoot remote or wireless functionality.
Here’s a quick look at the pros and cons:
Pros:
* Offers comprehensive timer functions (self, interval, long exposure, count).
* Allows for precise timing up to 99 hours, 59 minutes, 59 seconds.
* Compact and lightweight design.
* Includes a humanized backlight for low-light visibility.
* Provides wired connectivity for reliable triggering.
Cons:
* Build quality can feel a bit inexpensive.
* Some reports of connector durability issues over time.
* Settings do not save when the unit is powered off.
* Can be finicky with certain batteries.
Diving Into the Features and How They Help
Having used the JJC TM-F2 Intervalometer extensively over time, I’ve really come to appreciate the control it offers. Its core strength lies in its suite of timer functions, which go far beyond a simple shutter button. Let’s break these down.
Self-Timer Function: Delaying the Shot
The self-timer isn’t just for getting yourself into a group photo anymore, although it does that too! With this timer remote, you can set a delay before the first exposure is taken, ranging from 1 second all the way up to 99 hours, 59 minutes, and 59 seconds.
How it performs/feels: Setting the delay is straightforward using the directional buttons and the centre button to confirm. The display shows the countdown clearly. It feels reliable in initiating the sequence after your set delay.
Why it’s important/Benefit: The primary benefit here, especially in landscape or long exposure photography, is giving the camera system and tripod time to settle completely after you’ve touched the unit to set the timer. Even the slightest vibration can ruin a sharp image, and this delay ensures everything is perfectly still before the shutter opens. It’s also useful if you need to get into position yourself or simply want a hands-off start to a sequence.
Interval Timer: The Heart of Time-Lapse
This is arguably the most popular feature for a device like this. The interval timer allows you to set the time between consecutive shots. Just like the self-timer, the interval can be set from 1 second up to that lengthy 99+ hour mark.
How it performs/feels: Programming the interval is intuitive once you understand the layout. You set the interval time, and the unit takes a picture, waits for the set interval *after* the exposure is complete, and then triggers the next shot. The display clearly shows the remaining time for the current interval. It consistently triggers the camera at the programmed intervals.
Why it’s important/Benefit: This is absolutely essential for time-lapse photography. Whether you’re capturing clouds drifting, flowers blooming, construction projects progressing, or stars moving across the sky, a consistent interval between shots is crucial for smooth playback in your final video. Manually attempting this is virtually impossible for anything but the shortest sequences. The ability to set long intervals is great for capturing very slow-moving events or conserving battery life for extended time-lapses over days. Combining this with the exposure count feature lets you determine exactly how many frames your time-lapse will have.
Long-Exposure Timer: Beyond 30 Seconds
Many cameras have a maximum built-in shutter speed of 30 seconds before requiring “Bulb” mode, where the shutter stays open as long as the release button is held down. The JJC intervalometer makes Bulb mode usable by allowing you to program the exact length of the exposure, up to that familiar 99+ hour limit.
How it performs/feels: Setting the exposure time is straightforward. You put your camera in Bulb mode, set the desired exposure duration on the remote, and press the start button. The remote handles opening and closing the shutter precisely at the programmed time. It feels very reliable for repeatable long exposures.
Why it’s important/Benefit: This feature is indispensable for capturing motion blur in landscapes (like water), light painting, or astrophotography where exposures might need to be several minutes long. Holding down a physical button for minutes is tiring and introduces shake; using the remote eliminates this issue entirely and ensures your exposure is exact every time.
Exposure-Count Setting: Defining the Series Length
You can tell the remote exactly how many photos you want it to take in a timed sequence. This can range from 1 to 399 shots, or even infinite (indicated by “–“), meaning it will keep shooting at the set interval until you stop it or the batteries die/card fills up.
How it performs/feels: Programming the count is simple. The display shows the number of shots remaining as the sequence progresses. It reliably stops the sequence once the set number of exposures is reached.
Why it’s important/Benefit: For time-lapse photography, knowing your total exposure count is key to planning your final video length. Being able to set a specific number ensures you don’t accidentally fill your memory card unnecessarily or end up with far more frames than you need. The infinite option is useful for unpredictable events where you want to keep shooting until the action is over.
Wired Connectivity and Build
The JJC TM-F2 uses a wired connection specific to compatible Nikon cameras (make sure you get the correct model for your camera’s port type, though the product name lists many compatible Nikons).
How it performs/feels: The cord length (90cm) is decent, allowing you to stand a short distance from the camera. Wired connections offer reliable triggering without potential radio interference issues you *might* encounter with wireless remotes. The unit itself is compact (12.1*4.0*2.1cm) and lightweight (76g without batteries). The buttons are tactile, and the backlit LCD is a fantastic addition for low-light shooting, making it easy to see your settings in the dark. It requires two AAA batteries, which are easy to find. However, as mentioned in the cons, the sliding battery cover can be a bit stiff, and the quality of the included batteries might be questionable, so it’s worth using your own reliable ones. There have also been reports that the connection point on the remote itself, where the cable plugs in or is hardwired (depending on the exact sub-model/version), can be a point of failure with rough handling. Gentle handling is definitely recommended.
Why it’s important/Benefit: Wired connectivity ensures a direct, reliable signal to the camera, crucial for precise timing. The compact size makes it easy to slip into any camera bag. The backlight is a lifesaver for astrophotography or night time-lapses. While the build isn’t bulletproof, for careful users, it provides a lot of function for its price.
Ease of Use and Limitations
Getting started with the JJC intervalometer for Nikon is fairly intuitive, especially if you’ve used similar devices. A quick read of the instructions helps clarify how the different timer settings interact (like how interval time is measured *after* the exposure finishes). One notable limitation, as some users have pointed out, is that the settings you program do not save when you turn the unit off. While not a deal-breaker, it means you have to re-enter your desired delay, interval, exposure time, and count every time you start a new session. For repetitive tasks, this can be slightly inconvenient, but programming is quick enough that it’s not a major hurdle.
Overall, the feature set provides the necessary tools for sophisticated camera control, empowering photographers to capture images and sequences that would be difficult or impossible otherwise.
What Others Are Saying: User Feedback
Having explored the features myself, I also scoured reviews from other photographers using the JJC remote timer. Many users reported positive experiences, echoing the sentiment that it effectively does what it’s designed for, especially considering the budget-friendly price. Several noted that it worked seamlessly with their compatible Nikon cameras. Some users specifically highlighted its utility for astrophotography and capturing events like lightning strikes, praising its ability to handle long exposures reliably in Bulb mode. The intuitive controls and useful backlight were also frequently mentioned positives. However, some feedback pointed towards concerns about the long-term durability, particularly the build quality around the cable connection point, suggesting gentle handling is necessary. Issues with the supplied batteries were also mentioned, recommending replacing them with known-good ones upon arrival. Despite these minor drawbacks, the general consensus seems to be that it’s a capable and cost-effective tool for adding advanced timer functions to your photography kit.
Wrapping Up: Is This the Right Remote for You?
Ultimately, the core problem this tool solves is providing hands-off, precise control over your camera’s shutter for timed sequences and long exposures, preventing dreaded camera shake and enabling creative techniques like time-lapse. Without a tool like the JJC Intervalometer Timer Remote Shutter Release, you’re limited by your camera’s internal timers or manual operation, leading to potential blur, inconsistent results, and frustration. This remote is a great fit because it offers comprehensive self-timer, interval, long-exposure, and exposure-count functions in one unit. It’s wired for reliable triggering and features a useful backlight for night shooting. While the build quality isn’t top-tier and settings don’t save, for photographers needing these specific timing capabilities on a budget, it delivers solid performance. If you’re ready to take your long exposure and time-lapse photography to the next level without breaking the bank, click here to check the product out and see if it’s compatible with your Nikon camera.
Last update on 2025-07-13 / Affiliate links / Images from Amazon Product Advertising API